
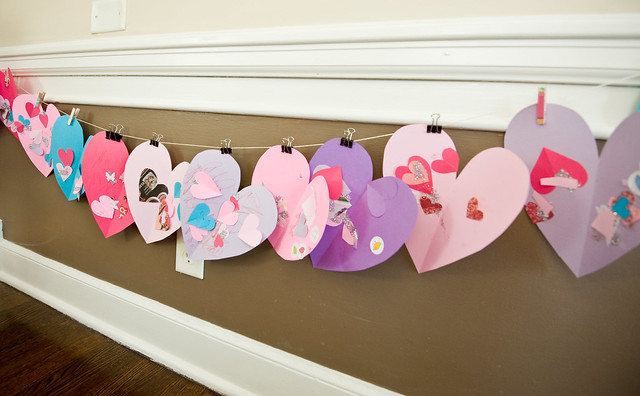
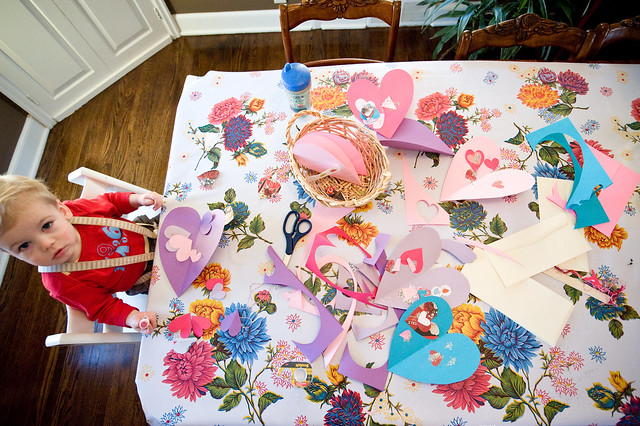
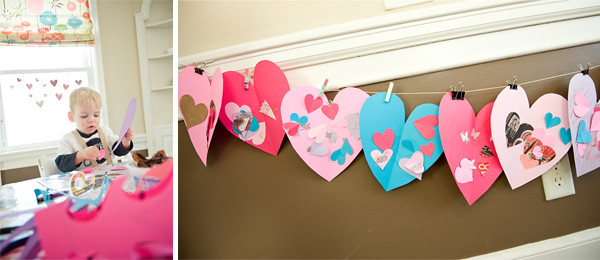
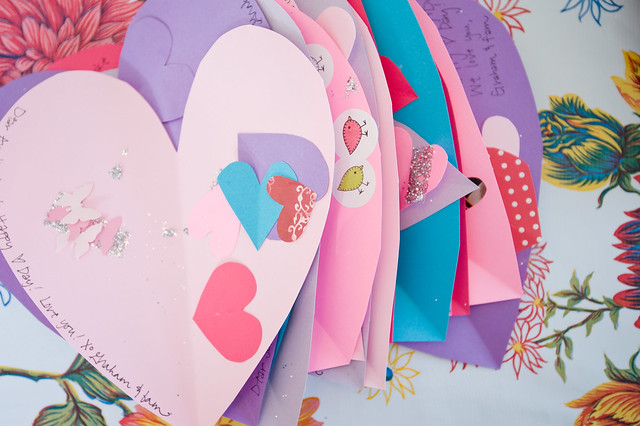
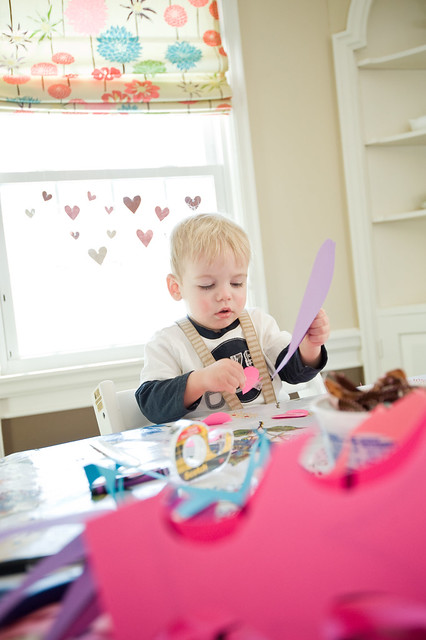
2.10.2011
valentines, check

12.22.2010
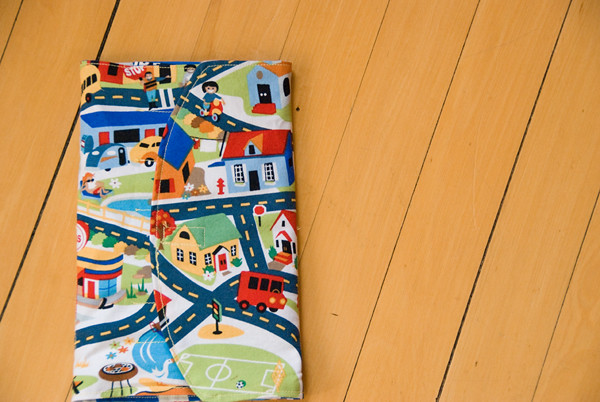
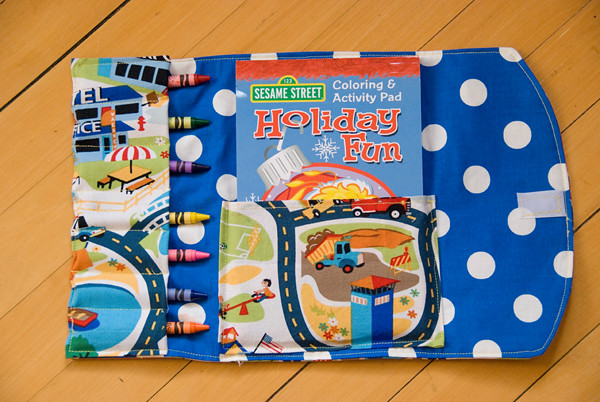
eli's crayon wallet
Hello and happy day! As of 7:00pm I am officially off of work until New Year's Eve. Pretty impressive for a nurse to swing such a schedule, don't you think!? Sweet freedom. It's such a good feeling. Sort of like the good old college days of walking out of your last final. Right now I am in the throngs of laundry, cleaning, errands, packing, and last minute crafting, but just wanted to share a couple quick pics of {part of} our nearly 3-year-old nephew's Christmas gift. This year we went all out with art supplies: easel + roll of paper, paints + brushes, markers, and a crayon wallet for on-the-go:
Are you Christmas crafting for the tiny tots in your life? If so, please share!
12.13.2010
how to host a craft party
1. If you build it, they will come. It's true. When I first posted an invitation for this party, I was a nervous wreck, thinking no one would show. But I learned that girls love a chance to get together, and they double love a chance to get creative when everything is spread out in front of them. So many of my friends say they wish they could be more crafty but don't have the time or inspiration. I shared a public invite both on facebook and this blog, hoping to meet some new crafty girls in the area and also share my love of crafting with some of my old in-real-life friends. In the end, I had such an overwhelming response that I had to turn some girls away. Stab me in the heart.
2. Plan, plan, plan. Even before sending out invites, plan what crafts you will to make. Not only will this step provide for a great teaser in the invite ("We'll be making X, Y, and Zs!!"), you'll also have more time to fine tune everything as the party approaches. Take inventory of the supplies you already have and make lists of the supplies you need to gather.
3. Time it. Be realistic about time frame. One project may take the entire duration of the party. Or teach your guests a smattering of techniques with 3-5 simple projects to fill the afternoon. Whatever you do, time yourself as you make each sample in order to guesstimate how long to schedule the party or when to quit coming up with more and more projects. (Ahem, super guilty here.)
4. Details. Don't forget about tools. This was an afterthought for me and I scrambled the day before asking people to bring extra scissors and paper punches. I was buying needles and tape and asking guests to sharpen pencils at the last minute. Tools are just as important as the craft supplies themselves and although we're all grown-ups, let's face it; in this case, the less sharing the better!
Do double duty with party favors and set out bags labeled with each guest's name so there is a space for her to put finished crafts throughout the party and a handy way to tote home her spoils.
5. Don't break the bank. Don't be afraid to ask your guests to bring a small amount of cash to share in the cost of supplies. I've never known a craft party without a supply fee (at least when the hostess is providing supplies). Another reason it's so important to determine the projects before sending out the invite is so that you can set a realistic budget and a realistic amount to pass on to each guest. I'll be completely honest here and say that my party did cost more than $10/person. But my intention was not to break even, it was only to avoid breaking the bank.
6. Be firm on numbers. I cannot, repeat, cannot stress this enough. Can I be frank with you? I had a lot of unnecessary anxiety over the guest list. Here's why: I specifically asked everyone to RSVP asap, but received a ton of maybes. When planning this sort of party, it's really difficult to work with all of the maybes in the crowd. {No offense to anyone in this boat!} I 100% understand that life is unpredictable, but I urge you to make it a clear expectation that your guests commit. Tell them you need to have a firm number in order to buy the proper amount of supplies. Next time I am seriously considering collecting everyone's supply fee in advance via Paypal, just so that they are less likely to flake.
Also in this vein,
7. Know your limits. Have a maximum number of guests your home/venue can hold and don't go over it. If the party is too crowded to craft the fun factor will go down. I set my magic number at 20 and had to start a waiting list at this point. After a bunch of last minute cancellations, I believe the final head count was 16. I think that was a perfect number for my house. Why did I invite so many people that I ended up saying no?? Because I didn't want to be exclusive. I wanted to open it up to anyone and everyone who was interested in this sort of thing. The best part about craft parties is that they can be big or small. For a close circle of friends or for everyone in your social network. Know what is manageable for you and your life!
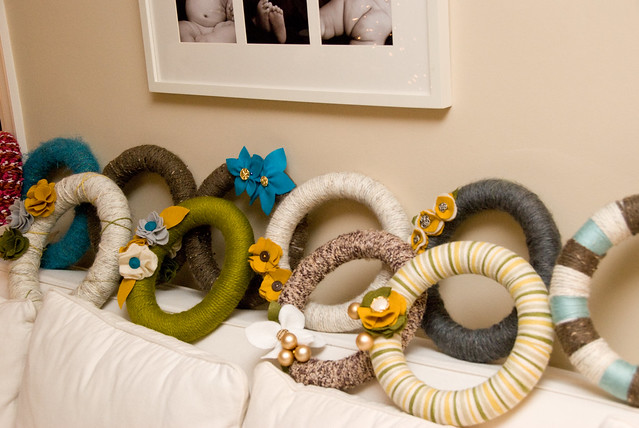
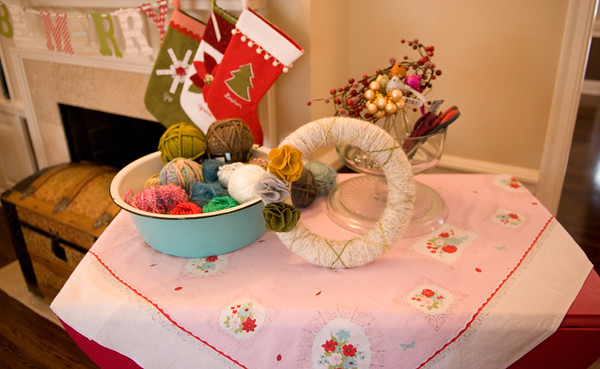
8. Map out your house. This is also key. Each separate craft should have a designated station. What rooms/areas would make good work spaces? Plan which crafts can be done on laps and which crafts require tables and chairs. Keep messy projects near a sink. Put projects that may take the most time in a large room and smaller-scale projects in a smaller area. If there is a two-part project, keep both stations adjacent to one another. That is one huge mistake I made. We made yarn wreaths, decorated with felt flowers. Half of the girls finished the yarn ring all at once and were wanting to learn the felt flowers. I had put the flower project in the smallest room with the least amount of workspace. Somehow I hadn't anticipated that people would spend as much time as they did crafting these to beautifully decorate their wreaths. People were sitting on the floor, tracing on the walls, and bumping into each other left and right. {And what dearies, they weren't even complaining!}
9. Feed them! I know this is basic, but I just want to say keep it simple here. One great way to keep party costs down is to ask guests to bring treats to share. I turned my party into half craft making, half Christmas cookie swapping. The spread was amazing--way better than I ever could have done by myself. It was so fun to sample everyone's baking talent. All I had to worry about was drinks! It's also important to consider that you'll be spending tons of time the day before cleaning your house and setting up your crafts, and the last thing you need to fret over is food.
10. Enjoy yourself. Face it, you can't be all things to all people. You can't individually teach every guest every project, or hold lengthy personal conversations with everyone. That's why for large-scaled craft parties or for varied skill levels, make certain that you are not the only one who knows what the heck is going on. (i.e. delegate.) I asked a few of my craftiest friends to arrive early so that I give them a brief run-down of all the projects. My sil kept the coffee brewing and felt free to mix & mingle. It was wonderful. Like growing extra sets of hands and eyes. I was able to relax and chat a whole lot more because I knew there were plenty of friendly resources bouncing throughout the house. It's also helpful to create multiple samples (if you have time!) of each project to not only present the basic concept but inspire variations on a theme.
Wow, so much for short. I really hope this is helpful!
I'd love to turn the comments into somewhat of a forum. I want to hear your feedback, questions, or advice on any area I missed! Also, please feel free to share links to your own craft parties past or present here!!
12.07.2010
christmas crafternoon {part 2.}
Thanks so much for saying such nice things yesterday. I've been itching to share some of the finished projects from the Christmas craft party. I can't even begin to tell you how fun it was to see everyone's projects come together. So proud of these girls! Before I begin, I should mention that I tried to give credit to the inspirations for each project. {Speaking of which--I completely forgot to give the biggest credit where it is due...Much of this party was modeled after this amazing friend's! I'd like to be her when I grow up.} Also, I would consider blogging more in-depth tutorials for specific projects, if there is interest. Just let me know in the comments. :)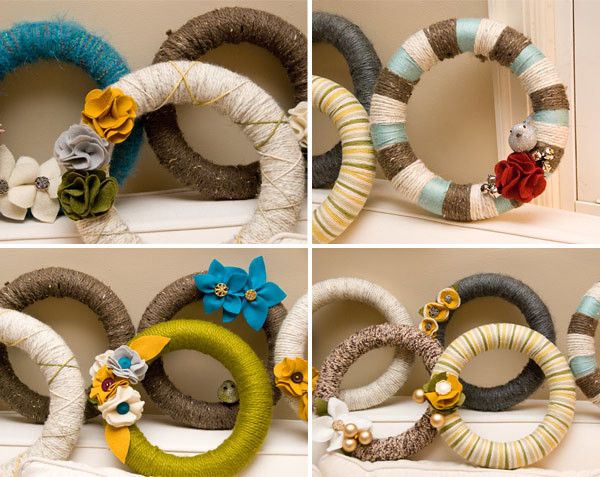


Naphtali | On Second Street
Olivia | the Saturated Palette
Amanda | Project Simple Life
12.06.2010
christmas crafternoon {part 1.}

*I asked everyone to bring a batch of her favorite Christmas cookies, plus 10$ to share in the cost of supplies. I might have had a melt-down if I felt pressured to prepare a huge spread of food on top of the crafts. Having everyone bring treats to swap was both fun and stress-less!
*I set up 5 different stations around our house, each with a different project. {More details on the projects tomorrow!} At each table, I had a finished sample, all the supplies necessary for the project, plus a few options for creative variations. At first, I felt a bit nervous about being in 5 places at once to offer explanations and troubleshooting, but everyone helped everyone and it magically all came together. {I have the sweetest friends!}
*For practicality, I was armed with a brown paper bag with each girl's name on it, so they'd have a place to stash their finished products as they moved throughout the house.
*I also made little paper ornaments as party favors for each guest & tied them around the brown bag handles to add a little flair. Nothing like killing 2 birds with one stone. {What a morbid phrase.}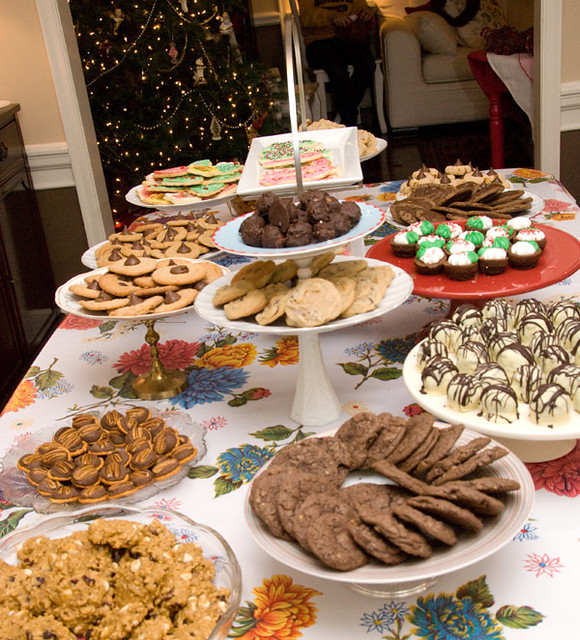
See part 2: finished products!


11.19.2010
friday idea book: diy rag wreath
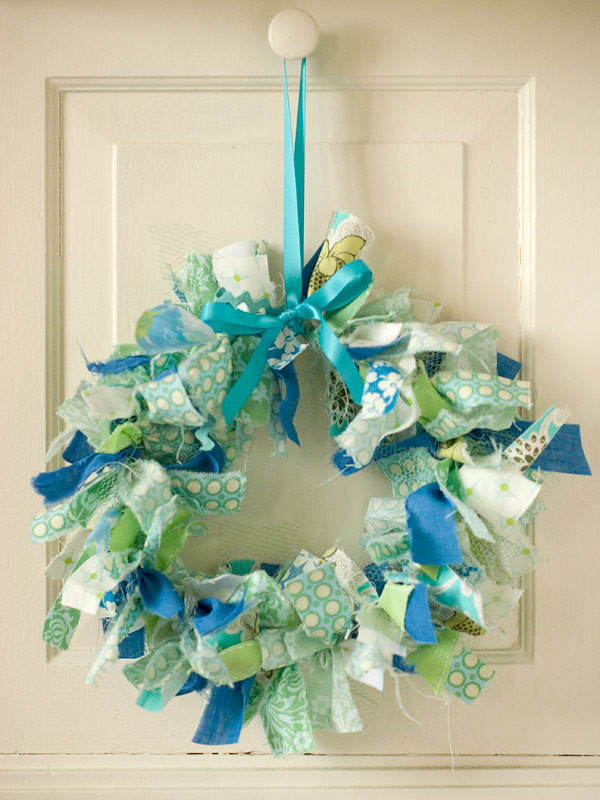
Supplies|
a heap of fabric scraps
basket
wire cutter or scissors
couch + a good flick
sturdy wire: I used 40 inches of plain old florists' wire, double wrapped. an old metal coathanger would also do the trick!)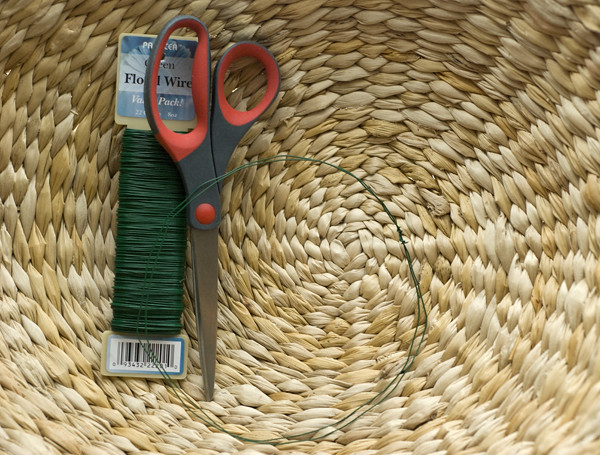
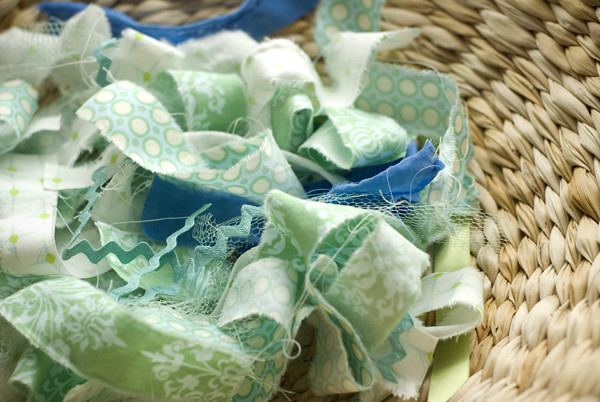
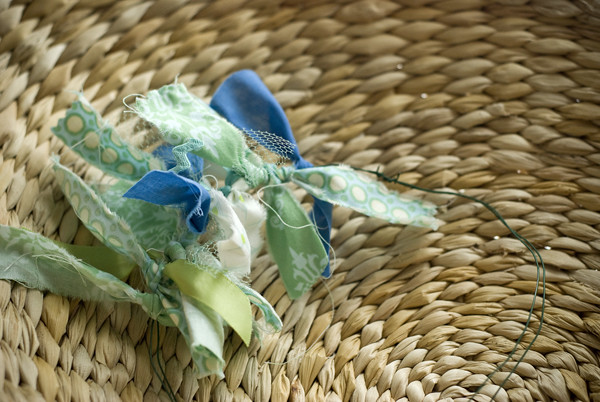
To finish it off, add a long satin ribbon with or without a bow. Hang and be merry!

11.16.2010
why not sew a snake

9.10.2010
baby sign language flash cards
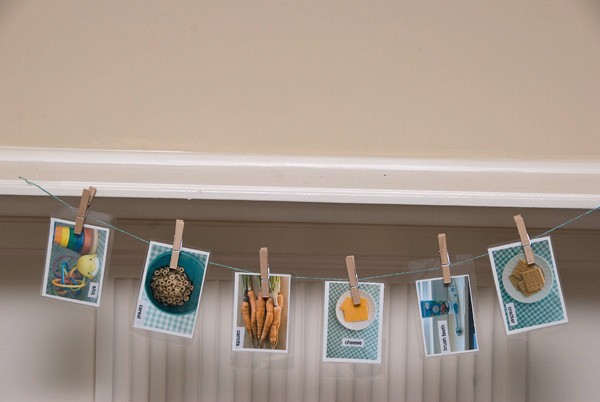
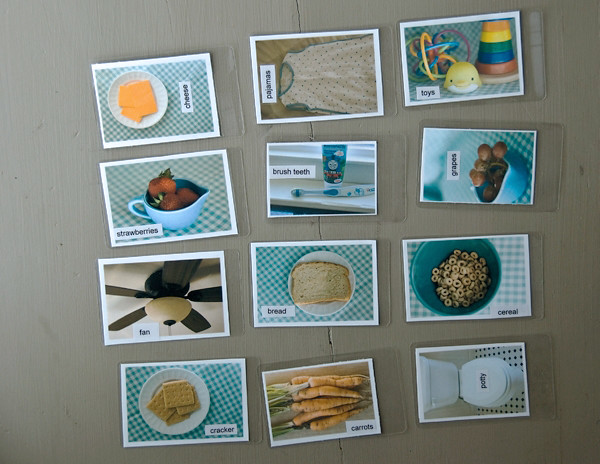
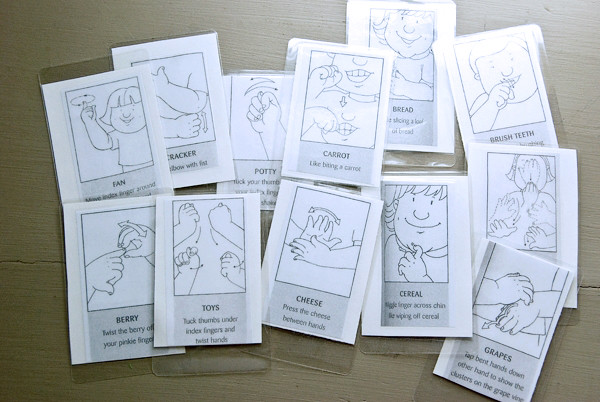
To polish them off, I borrowed my mom's laminator. I made just 12 cards as a test batch, but I'm really happy with how they turned out and I'm glad I took the extra 5 minutes to laminate them. (I've already been wiping play doh and cheese off of them, tmi!) Also, a word of warning: laminating is highly addictive. I have plans to make dozens more flash cards, just so I can laminate them. Perhaps I should've been an elementary school teacher, because I just can't get enough of it!
8.19.2010
made my shade
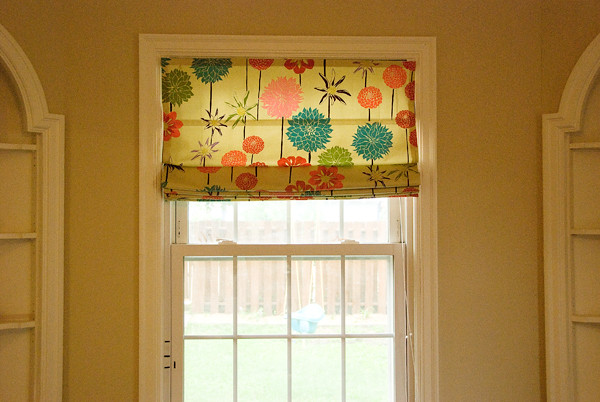
Believe it or not, I made my shade by gluing fabric to vinyl mini blinds using this tutorial from Little Green Notebook, one of my favorite design blogs. No sewing involved! Overall, I am pretty satisfied with the results: Ample sunshine by day and ample privacy by night. The price tag for two shades was around $50, and most of that was spent on the fabric. Hooray for DIYing.
6.22.2010
ruffled up
I love these photos Jeff took of G and me at the park. I'm really proud of this pink ruffled t-shirt I made using this tutorial. You should make one too! Just 2 plain, identical t-shirts on the clearance rack at Old Navy + my scissors, sewing machine, and an entire pin cushion. It has become a staple in my summer wardrobe. There's just nothing like the satisfaction of making something that looks J.Crew-caliber and knowing you did it for practically pennies.
He's walking running everywhere these days. I don't know how I'll ever keep tabs on him in our big new house. It's hard enough to keep an eye on him in a 1,000 square foot apartment!
He has an irrational fear of grass. (See above.) It's the funniest thing--whenever we set him down in the green stuff he lifts up one or both legs, scowls, and whines. He's fine walking in it, but hates the way it prickles his bare, chubby legs.
He's beginning to climb. Oh my. He's even clever enough to pull up a toy to use as a step stool. Am not encouraging this behavior.
We've taught him a little bit of sign language. Just the basics. He consistently uses more (and borderline abuses it), milk, all done, bye bye, and up.
We're still working on change, water, please, thank you, love you, book, car, fan, eat, help, and sit...
3 real words have emerged from his sweet, endless babble:
"Dada"
"Tickle"
"Hello"
Peculiar first words, I know. His first hello came out today at the park, clear as a bell, when he walked up to a little girl by the slide. He hasn't repeated it since, and certainly not to anyone over 3' tall. Funny.
He also barks at anything with four legs. We are working on that.

6.01.2010
paper pinwheel how-to
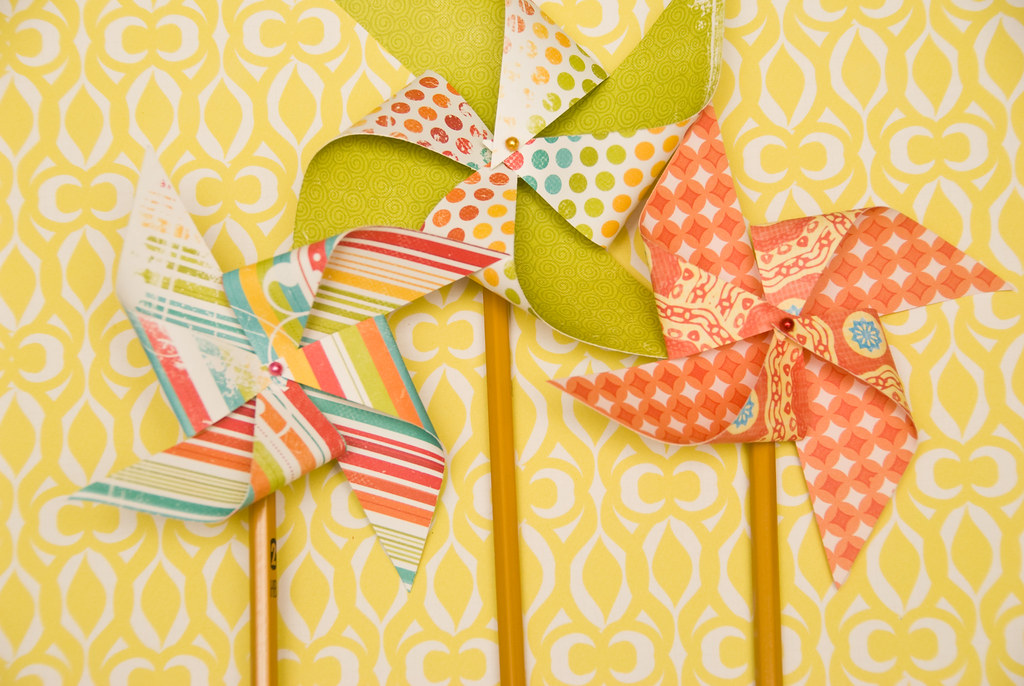

a bunch of cheap yellow pencils (you can sharpen and reuse them in September!)
scissors
pretty sewing pins
double-sided paper (stock up at your local scrapbooking store)
1. Cut your paper into 4x4" squares. (5x5" makes a slightly larger, equally cute pinwheel. Go ahead, experiment with sizes.)
Next make 4 diagonal cuts toward the center. Stop about an inch shy. No mathematical equations here. Just eyeball it.
2. Gently fold pieces to the left of each cut toward the center. Hold firm with your thumb.
3. Press pin through center, being careful to catch all 4 corners.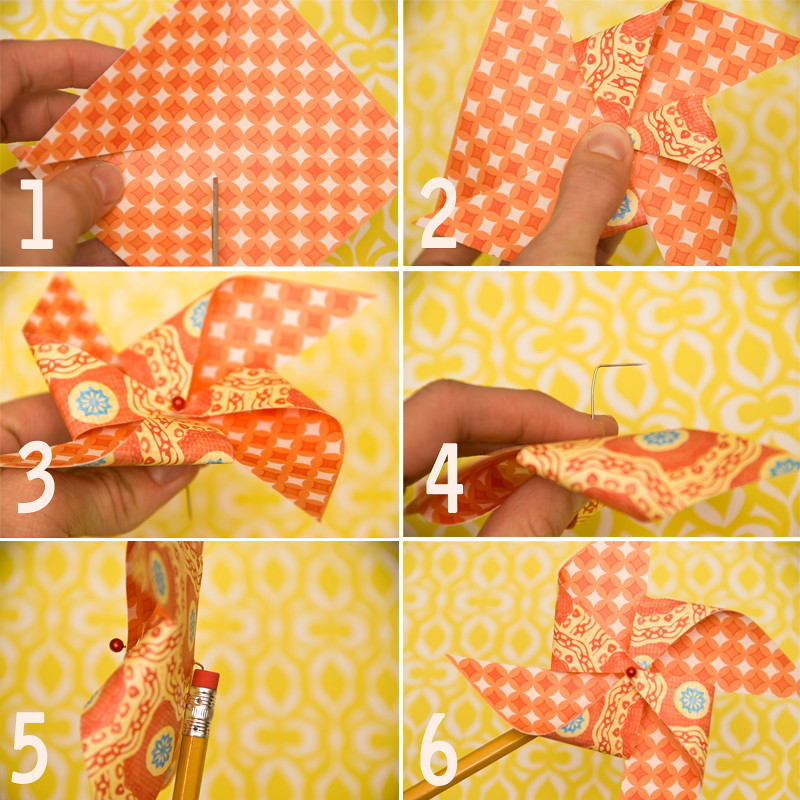
5. Press pin firmly through top of pencil eraser.
6. Give it a whirl! Easy, peasy, right!?
3.29.2010
sunday bags

1.29.2010
organizing with clipboards
Sometimes I get frustrated by how little I can accomplish some days. I keep reasoning that if only Mr. G would take longer naps...I might be the most productive woman on earth. But then again, feeding my little bear cub, saving him from drowning in the toilet and other household hazards, keeping dipes clean, reading stories, and scaling the stairs together day in and day out is a mighty feat of productivity in and of itself.
I used to feel like a failure of a mama because the lad took such pathetic naps. To this day, he almost never naps for more than an hour and almost always sleeps for less, despite my best attempts at putting him to sleep in a consistent place at consistent times with white noise, a dark room, a security object and all. I'm over that now (feeling like a failure that is...the napping rituals still hold true). Once a cat napper always a cat napper I suppose.
The reason I drone on about my lack of get-to-itiveness is that I've been trying to post about my lovely new clipboards for the past week. And truth be told, I am a control freak to the core, plain and simple. I yearn to be more organized and efficient. That's why I was so inspired by this post over at the Creative Mama (one of my latest daily favs, btw) and also Marta's mini rendition that I simply had to experience these for myself.
Clipboards, ingeniously taking our messes to a whole new level, off the counter, on the wall, in a fancifully organized fashion. (p.s. I am beginning to feel like a one trick pony with all of the decoupaging I've been up to lately, but the possibilities are seriously limitless.) Three full-sized clipboards, decoupaged with pretty scrapbooking paper, and labeled with my top 3 kitchen clutter-causing criminals: Market, Mail, and Meals.
 My 'to Market' clipboard is where I vow to stick my
- coupons
- grocery store ads
- receipts
- weekly grocery list

 Although we've transitioned to paying most bills online and are usually pretty good about immediately filing junk mail in the recycle bin, we still need a mail clipboard to hold:
- pretty invitations
- cards
- anything requiring follow-up or filing
- outgoing mail

 Perhaps the biggest + best step toward a more organized existence: meal planning. I try to pick out 5-6 recipes that I want to make each week before finalizing the grocery list and hitting the store. It seems to save so much time during the week! Here is where I'll file:
- a list of this week's meals
- pertinent recipes
- magazine clippings or internet print offs of my latest discoveries
11.16.2009
diy button ponytail holder
 This little craft is a one minute wonder!! I'm not even kidding, from start--to finish--to snug in your pretty locks, this is a true quickie. Now that I am back at work and barely finding enough time to keep the floors clean and the socks folded, I am embracing instant crafts like this. Plus, not a day goes by without my hair winding up in a pony. Imagine that! Now I can sport my usual 'do with a bit of flair.
Ready, get set, go:
1. Gather up your goodies: you'll need a small scrap of your favorite fabric, an elastic ponytail holder and a metal button covering kit (any size will do--I chose a 1" diameter)
2. Following your kit instructions, trim fabric to size, place over button, press, and ta-da! You've created your custom look. 3. Take your pony holder and loop+swoop it through the eye of the button. I found that using an old pony with over-stretched elastic was the perfect trick to easily advance it through the button. Of course your results will depend on the size of buttons and elastics you use, but you get the idea!
4. Admire your darling finished product, tie back your hair, and go greet the day!
10.06.2009
scrap at it.


 Ahh, finally my little crafting space is unpacked, my table is cleared off, and am ready for some serious projects. This week I'm pulling out my scrapbook supplies and starting on Mr. Graham's book. It's about time...This kid has way too many pictures! After giving it some thought, I've decided to archive his 100s of pictures in a Kolo album and save the best of the best for true scrapbook pages. That way I can focus on journaling and creating around the major milestones and sentimental stuff--and not be burdened with guilt over our multitude of our family pictures. I feel like the digital age is a bit of a catch 22. Having so many pics and memories is absolutely wonderful, but maybe just a tad overwhelming? All this makes me very curious...what works for you? How do you organize your photos?
10.04.2009
the chicken's first halloween {diy style}
 We're getting a little giddy about Halloween around here. Just finished stuffing G into his chicken suit for a trial run. (And yes, he eats the feathers!) It was easy to decide on a costume theme...After all, he's been our spring chicken/early morning rooster since day 1! I just couldn't find any cute chicken costume in stores. So, I set out to make his very own and discovered that there's something very magical about a homemade Halloween costume.
This is actually pretty simple to put together: For the body I sewed together 2 long-sleeved onesies (2 sizes too big) and stuffed stuffing in between to make him extra plump. Then I took two 6' white feather boas and tacked them all around. To make the legs + feet, I sewed yellow rubber cleaning gloves to a pair of yellow pants. And the hat--Just an old white t-shirt of Jeff's plus a few chunks of felt and black buttons. :)


