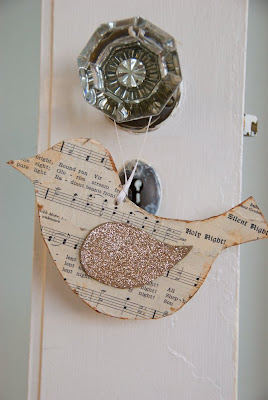
 For anyone needing a quick handmade gift, or just a little crafting inspiration, I thought I'd share the skinny on how to make this sweet+simple song birdie ornament. This ornament is super simple to make, so I hope I'm not insulting anyone's intelligence by deconstructing it step by step! :) Sharing a little Christmas joy+ joining in the tree trimming fun here:
Step 1. Assemble supplies:
*glitter (I chose to use Martha Stewart glitter in smoky quartz)
*decoupage
*glue
*thin ribbon or baker's twine
*glue brush
*scissors
*chipboard (a fancy word for dense cardboard. but seriously, just cereal box thickness will do.)
*vintage sheet music (mine is ripped from a destroyed old hymn book. for a new-school alternative you might also use scrapbooking paper or xeroxed music, stained with tea or distressing inks)
*small hole punch (oopsies! forgot to add in pic!)
*waxed paper (optional for tidy crafters!)
*birdie template (below: just click to enlarge and print page)
 Step 2: Print + cut out template above. Trace onto chipboard and trim your 3 pieces:
 Step 3. Paint both wings some good old fashioned Elmer's, douse with glitter. Shake and let dry.
 Step 4. Rinse paint brush, whip open your decoupage, and cover one side of bird. Tear pieces of music haphazardly, place over bird shape, and coat with more decoupage. Allow to dry. Repeat coat if desired.
 Step 5. Trim paper around bird's edges. Flip bird (no pun intended!) and repeat decoupage process on reverse.
  Step 6: Adhere wings to both sides. Use Elmer's, tacky glue, or anything strong you've got.
 Step 7: Punch hole, loop with ribbon, and you're ready to fly. Go trim that tree!

Fantastic idea!
ReplyDeleteVery nice...I could see this birdie as a flock covering a tree or maybe strung together for a garland--fun!
ReplyDeleteJessica, after reading your directions, I've decided that this project is way more complicated than I could ever attempt and that I got an absolute STEAL having you make them for me! Many thanks again for the ornaments. They look lovely on my tree and my sister, sisters-in-law, and mom will LOVE the ones I bought for them!
ReplyDeleteso cute Jess, definitely a little song bird :)
ReplyDeleteAnd I love that the wings are glittery too.
absolutely gorgeous! i can't wait to whip me up a few for my tree! i am filing this idea at thecraftersfilebox.com.
ReplyDeleteThanks for much for sharing!
Thanks for sharing this pattern with us. I have put a link to you on my freebies blog...hugs Khris
ReplyDeleteI love this idea and have filed it away. It's too late for this years tree (at least for me), but an idea for more things little bird can hang about on. :). Thanks so much for the idea.
ReplyDeleteahhh I just saw these again on little birdie secrets.. I knew they looked familiar...
ReplyDeleteso great.
Hi!
ReplyDeleteI recently posted an entry on my blog with a link to this tutorial and template.
I'd appreciate your letting me know if that's OK.
Thanks,
Nancy Ward
http://paperfriendly.blogspot.com
Love this!! I made one tonight and it turned out perfect - even my husband gushed about it. I may make some more to give away as gifts! Thank you for sharing the tutorial!
ReplyDeleteWhow...what a very great idea.
ReplyDeleteI see your fantastic blog and
I joined as a member of your blog.
Очень просто... И ТАК МИЛО!!! Спасибо за идею.
ReplyDeleteThanks for sharing.
ReplyDeleteIt is also possible to use cookie cutters as a stencil for drawing the shapes.
I have one with a butterfly.
Greetings
Maria
Love your idea!
ReplyDeleteHave a nice day, Susan from Holland.
Love your sweet bird. I'm planning on Valentine's, so will cut bird shape from one paper, wing from another and add a heart shape for the bird to hold in her beak (or maybe tuck one under her wing). Beautiful. Thanks! p.s. When I do make it, I'll put put a link on my blog diannefaw.wordpress.com
ReplyDeleteBeautiful project!
ReplyDeleteThanks for sharing! I liked it so much I have linked it to my blog as a winter Christmas project-I hope you don't mind.